Showing posts with label Furniture. Show all posts

Thursday, August 1, 2013

DIY Rope Shelves

 It feels like it has been forever since I have done a post on Mon Ami and for that, I'm Sorry! I have been doing a lot of little tiny creative things, nothing to really blog about... and then my husband and I took a little trip to Tennessee last week, which was fabulous! We stayed at CedarRock, slept in  the coolest  barn (which had been completely renovated into a 3 story lodge), went kayaking/canoeing, visited cute little town squares, and got lots of QT with my family... plus TN is just beautiful so we just drove around and went "ohhh look at that.. That's a really old barn... DEER!!!.... Antique Store, lets go... oooh aaahh... turkey!.... That's pretty... that's a cool old building...." etc. We cant wait to go back!

 So now lets get down to the good stuff!
 
I had planned on doing a beachy theme in my Master Bath, because we just miss California so much! But i'm pretty picky when it comes to decorating... see I wanted it to be beachy, with out saying "BEACH!!!" ...just wanted the feeling of beach. Does that make sense??

I had seen rope shelves before in magazines, so I did a little search on Pinterest and Google and found these images for inspiration (sorry, no links)... I needed a shelf for over the toilet and another to create storage for my linens and other decor, since my bathroom didn't have a linen closet and had storage issues. These were perfect!

I didn't find any step-by-step directions, but it seemed very self explanatory: Buy some wood, cut some wood, drill holes, stain, measure/cut rope, and then hand and tie the shelves....  It really was such an easy project and I actually created these shelves at the last minute (or day) because I was unable to find budget friendly storage solution and my bathroom was desperate for something.

 Here is how I did it:  

#1 Collect your supplies: Wood, Stain (brush/sock/gloves), Rope, Plant Shears, Drill, Masking Tape, Level, & Tape Measure, Eyehooks/hooks.

#2 Buy/Cut the wood. I have a friend who works at Lowe's and helped me pick out the wood and cut it to size. (FYI, Its good to have friends at Lowe's or any other hardware store)

#3 Drill the holes. If you haven't heard of a spade bit, well now you have. Its a type of drill bit to connect to your power drill and it makes holes in wood projects. I measured the holes, made my mark and decided to cut a 1/2" hole in all 4 corners to accommodate my 3/8" rope.

#4 Stain the wood. I had leftover General Finishes Gel Stain from staining the two bathroom vanities so put one coat on all of my planks. (this step took the longest, because of the dry time)

#5 Hang your hooks. This part could be the trickiest. Since the three tiered shelf over the tub was going to be REALLY heavy after it was installed, I needed to put my hooks into the studs... the problem: the studs were not where I needed them. My Dad, my Uncle and I spent about an hour inside Lowes debating on how we should hang them, what would be the easiest, strongest, and least invasive. If you haven't checked out the hanging section in your hardware store you should, there are a million ways to hang something and deciding isn't easy. We then noticed in the picture above that they must have had the same issue because they screwed a plank into the studs and then hung their hooks from the plank... So that is what we decided should be done. You can't tell but I used eyehooks.

Since the shelf over the toilet was small and wasn't going to hold much more than toilet paper, I just used small hooks that I screwed into the drywall. (Easy-Peasy, took 3 minutes)

#6 Tie your ropes. The hooks over the toilet were "J" hooks so I pre-tied each rope then hung it on the hook. I left plenty of rope hanging so i could level and tie each end off after I put the shelf on. 
I have no pics of this part of the 3-tier shelf, but its basically the same process only I had to tie the rope while it was through Eye hook because the hook is completely closed.

(ROPE 101: There are 3 types of rustic/nautical rope: Jute, Sisal, & Manila. Jute is usually smaller than Sisal and Manila. Manila is darker than Sisal, due to it being a different type of plant. I chose Manila rope for this project because it was darker.)

*One perk of using this "J" hook over the toilet is that if I ever need to access the insides of the toilet, I can simply unhook the shelf from the wall and replace it. (the Eye-hooks on the 3tier shelf is a more permanent thing)

#7 measure the rope, tape it off, add your wood,  tie your knots, level, re-tie, level, re-tie... and so on until it is level and complete. On the  back side (closest to the wall), I measured from top knot to where I wanted my shelf to be since those were the vertical ropes. Then I used the painters tape to mark that spot. After I strung the rope through the holes I tied the backside on. Then i strung the rope through the front holes and held it in place until it looked even, then tied them off. Then I used my level to adjust all the knots and make it level.... Its really not as hard as it sounds.
 The second and third tiers on the large shelf were much easier to measure and level since all of the ropes were hanging vertical. My shelves were spaced 16" apart from knot to knot.

 *Helpful hint: Use plant shears to cut the extra rope ends off. Its much easier than scissors or a knife!


#8 Accessorize & Enjoy!


In case you were wondering how much I spent... I don't remember but I know it was under $50.

I am so pleased with how the shelves turned out!  This really was what my bathroom was missing, not only is it simple and functional, but I think it adds to that beachy feel I was going for.

(If you missed it, see the full bathroom reveal >>>HERE<<<)
 -Ashley-

Wednesday, June 5, 2013

The End Tables

I have been MIA as I have been finishing up the  last couple weeks of work. We closed our doors on Memorial Day and then spent a week of cleaning up and cleaning out. Boy oh boy. Only two melt downs AND when we locked up for the last time yesterday I actually didn't even cry, had the biggest lump in my throat but no tears :) !!!! I am excited for the new adventures ahead and what is in store for all of us.

Well enough of that it is my time to get caught up and catch up everyone else on what's been happening in my life.

I finally finished my end tables and am so in LOVE with them. I am on the fence about sanding down the tops so I will need every ones input on what they think.


You remember this is what the tops looked like and the base was the same color except smooth.

This is what they turned out like:

I ended up deciding on papering the base instead of spray painting it. I just felt that they needed something more. So I knew World Market sold large sheets of really nice patterned wrapping paper and they fit perfectly on the bottom. With a little spray adhesive and a huge sticky mess later I had finished and was so thrilled with how they turned out.

So what do you guys think??? Sand the teal tops to give more a vintage worn look or keep it more on the polished sleek look???

Til next week,
xoxo
Danni

Friday, May 24, 2013

Please, stare at my chest!

In January I purchased an unpainted chest of drawers from Ikea.  It's size was perfect to use for a multitude of purposes - side table, entryway table for a small apartment, sock drawers in a closet - and so I brought it home.  I then left it in the box by the front door for four months.  Oops.

Well it is not in the box anymore, baby!  And I am ecstatic with the results!


I painted the sides and top with a high-gloss paint, and painted the knobs with a metallic spray paint.  I love the way the metallic spray applied to the wooden knobs so that you can still clearly see the grain of the wood.

As for the drawer faces, the butterflies came from an inexpensive poster - another score from Ikea.  I decoupaged them to the front of the drawers, then painted a layer of hard coat Mod Podge to the front to seal it, knowing that my hands would often be on the fronts.  


I also Mod Podged a matching letter holder.  One slot for "to-do," one slot "to-file."

And I am never afraid of adding a bit of glamour in unexpected places.  A crystal bowl to hold my keys?  Sure!  

xo Allison

Friday, April 26, 2013

Bringing that EVOO in to the kitchen


When I lived in San Diego, I had the boldest shade of yellow on my kitchen walls.  It was appropriately named Extra Virgin Olive Oil, and it was yellow with just enough green in it to make it unusual while still being a versatile shade of yellow overall.  It looks good with brown, tan, black, grey, and almost every color of the rainbow.  I was obsessed.

When I found out that I had to move for work, meaning I had to paint over my happy yellow walls, I was very sad about it.  So, I drove up to my new city with the can of EVOO in my backseat, waiting to find its next application and adventure.

Six months later, I got tired of driving around that old can of paint - yes, I said six months.  The weird thing is that I cleaned trash and everything else out of my car, I just never removed the paint can! - and so it was finally time to put it to use and bring some cheer to my new home!

Before.
Enter old hand-me-down furniture.  Which, I love by the way.  I got this fabulous, sturdy oak dining set for free from a family friend.  The only problem with it was the way it was painted.  This Before image is actually the already-stripped down furniture.  I will not frighten you with the details of the paint stripping process because if I learned anything from that step, it was to NEVER DO IT AGAIN!  It was days of hard work and this is the best I could get - even now under the yellow paint, there is visible texture in some areas where the old paint wouldn't sand off.

After!
Anyway, after one layer of primer, two light layers of paint, and about 15 hours of work, the dining set is complete, and I have a bit of my old home in my new home!  I say 15 hours of work, but because I had help, the job was completed over about only 8 hours.  Chairs on Saturday, table on Sunday, and it was a fun excuse to enjoy the outdoors when I really had more pressing chores to do indoors ;)

xo Allison


Monday, April 15, 2013

Turn Something Old into Something New #2

Growing up I was always under the impression that buying things at the thrift store and the Salvation Army was for poor people. Well, now that I am a poor struggling college student, I shop there too!! Lol! Just kidding. But in all seriousness, I feel like shopping at those place have a bad connotation, and I’m here to break that. Shopping at the Good Will, and similar stores not only saves you a TON of money, but it can also be like a treasure hunt. You have to sift through the bad to find that diamond in the ruff, but once you do, it makes your whole experience worth it.


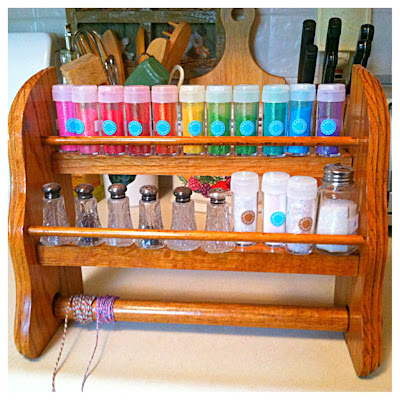
Living here in Southern California, most of the antique stores tend to be “Antique Boutiques” and can be very pricey. But places like good will, and Salvation Army are just the opposite. My latest find was this little Beauty. It’s a paper towel holder and spice rack all in one. The thing to remember when on the hunt is to keep an open mind and an open imagination. You see a crusty old spice rack with years of build up from being hung on the wall of someone’s kitchen. I see a new way to organize my glitter and twine.


I took my find up the register and purchased it for only $3.00!! That’s unheard of! Where could I find a quality piece of maple for that cheap these days? Then I took it home and put in a little elbow grease. I scrubbed the whole thing with Fantastic and a scrub brush. I got all the years of grime and build up off in very little time. Then I took some furniture polished and wiped it down until it shined just like new again. The spice shelves on it held all my bottles of glitter perfectly. It’s my dream to eventually convert all my glitter into vintage salt and pepper shakers. And I think this spice rack is the perfect way to display them.

Then I took my twine and began winding it around the paper towel dowel. Since it’s made to spin, whenever I want twine, ill just unroll the amount I need. It will NEVER tangle and always be there right when I need it. Obviously I haven’t finished winding all my twine I own, but you get the picture. Everything is where I can see it, and if I don’t say so myself, it looks pretty darn cute once it's cleaned up and displaying all my crafty treasures!


I hope you feel inspired!


Wishing all the best week ever; take good care and ill see you next Monday!

Love,

Mandy


Wednesday, April 10, 2013

This and That

Well I had such a wonderful week with my family. We went all over San Diego and had a BLAST!!!! Gramma got a HUGE hotel room so we decided to stay at her "house" all week long. We swam, ate, walked, looked at animals, ate,  drove, ate, shopped...lots of eating lol.

Take a look at some of the adventures we took Gramma and Elisha on. (I didn't get too many, I either forgot my phone or it was dead.  But, Gramma took a bunch and I will post some of those at a later time)
 Gramma on a Scooter!! She made Elisha hold the drinks so she could go for a ride. Gotta love it. :)
Skipping rocks at Lake Murray
 Phoenix and Gramma cruising
 Ocean Beach Sunset
 Old Town covered wagon photo op


I also have finally finished my little table I rescued. I am so happy with it. I have yet to get it all set up, but it is FINALLY finished.


Remember, this is what it looked like. Red and cackle and peel-y. I sanded thru about 4 layers of different colored paints to the bare wood. The sprayed a base coat, gave a light sanding, then sprayed the green, sanded it down and sprayed another coat. I then sanded all around and heavier around the edged to give it a nice distress look. I am so happy with it and can not wait to get it all set up.


And to finally catch up....Here are some Easter pics :)


Thursday, March 14, 2013

Trash to Treasure Thursday

Its Spring Break here in Texas!! While the break from school is nice, I've spent my time off of school turning this old Craigslist find into something I really Treasure!

About 2 years ago, I scored this lovely garden patio set for $25! The only thing wrong with it was that the three chairs were all missing the seats. (yes, its a little rusty and yes, some of the paint is chipping and you can see other layers of paint... But i like that!) Right after we bought it, my H and I went to the hardware store and bought three 15" wood rounds that we would just have to screw on. Yet the chairs still sat seatless on our patio and storage unit for a while. After moving into our new home and seeing the seatless chairs everyday, I decided I needed to finally do something about it. Spring Break gave me the perfect opportunity to work on them! 

Spray paint has become my new best friend. Spray paint makes it super cheap and super easy to change the color of something.  (Rust-Oleum is by-far my favorite brand to use, trust me... some brands just suck.) Since I am in love with teal, I found this can of "Lagoon" color at Walmart for $3.60. I sprayed three coats on each wood round and sanded in between each coat.


Painting the seats was not enough to Revamp this set. I wanted to paint the flowers on the top part of the chair the same color as the seats to keep it cohesive, so I sprayed a couple spritzes of paint on a paper plate and used a paint brush to paint a few flowers on each chair. I also used my regular old acrylics and mixed up some colors that I liked for the other flowers and centers and leaves. I also went a put a clear sealant over the acrylic paint so it didn't scratch off of the metal.


 I painted both the front and the back flowers on the chair.


I am so pleased with the way that the chairs turned out! My garden patio set is finally complete! I can't wait for warmer days when I can sit outside under my porch, drinking some lemonade, reading a magazine and watch Rex run around. 

 
 ....When we moved into our new house the old owners left their patio set on the back porch. It has four chairs, and the table has an umbrella! The chairs have floral detailing on them, but they are an all-over a dark green color and the umbrella fabric is ugly. I'm thinking a summer project is going to be Revamping it by spray-painting the entire thing and recovering the umbrella in a much prettier and fun fabric! I can not wait to start, the ideas are flowing and I need to head over to Joann's to check out some of their Sunbrella fabric selections. 

Yay for spring, summer, and warmer weather! 
-Ashley-

Thursday, February 14, 2013

Revamp (one of my favoite words)

I want to start by addressing that today is Valentine's Day. Happy Valentine's Day! If your not able to spend your day with someone special, be sure to treat yourself or do something that you love! Today, I want to share with you something that I love.... REVAMPing furniture!

I love giving a new life to an old or generic piece of furniture (Revamp)!  With a little bit of time and a little bit of money, you can have yourself a brand new custom piece of furniture that you just might fall in love with, and your friends might too. Changing up an old piece is so much easier than you might think...  the hardest part for me is always deciding which color to pick!

And now, I shall tell you the story of the Goodwill Table.
Once upon a time, about 5 years ago, there was a sturdy little pine end table that was donated to a Goodwill. While thrifting one day, a mother -my mother- saw the little table and thought it might make a good end table in her home even though it didn't match anything. She told herself and her daughter that she would paint it before she used it in the home and then she purchased it for $5. This little end table, sat in a spare room for a while, the mother was too busy to paint it. Slowly, the table creeped into the main areas of the home where it was covered with a table cloth. Upon returning to the home last summer, the daughter took the mother into a boutique thrift store where new -old but new- furniture finds were piled in the entrance. Scratched up and splotched with chewed up, dried up, bubble gum wads were two matching tables that were not cleaned up to go on display. The daughter noticed that they were identical to the Goodwill table. The daughter pointed them out to the mother and the two tables were purchased for $15 total. Now the mother had three sturdy pine end tables, but they did not match anything in her home. The daughter began giving the mother lots of ideas of all the things she could do to the tables to make them so SOO much better! -and here is where I will stop telling the story in 3rd person.. I know I know, I was just getting to the good part. so let me continue.-

After finally deciding to give them a Distressed Farm House look, I took my mom to Lowe's to purchase our supplies which came to around $50:
  • Spray Paint (satin ivory)
  • Spray Varnish Remover.... Get the Gel Varnish Remover if available.
  • Scrapers (probably not the technical name)
  • Sand Paper Blocks
  • Walnut Stain
  • Spray Sealant 
  • Painters tape
Now it was time for a little elbow grease. (not purchased at Lowe's)
1 - We wanted to stain the wood on top darker so we needed to remove the varnish. I set the tables outside, in shade, and coated the top with the spray varnish remover. After letting it sit for 20 minutes I began to scrape with my scraper. Each table top had to be sprayed and scraped about 3 different times to even get most of it off. I was disappointed that the spray didn't penetrate and remove the varnish as well as I was hoping it would. **I suggest getting a Gel Varnish Remover instead of the spray, If its available. Gel will coat the top more generously and reduce the time you spend scraping. I also suggest wearing gloves, the varnish remover burns when it touches skin! ** After all of the scraping and most of the varnish being removed, I lightly sanded the pieces all over. (top left picture)

2 - Next is Painting and Staining the top. My Mom actually did this part. She turned the tables upside down, taped off the top (now bottom) and gave them two even coats of Ivory spray paint. After the paint had dried completely, she taped of the base and applied the stain with a foam brush to the top. She loved the look of the wood grain and decided to stop at one coat of stain.  (bottom left picture)

3 - The base of the tables were so stark white and clean looking. To achieve that Farm House feel we still needed to do distressing. After painting the tables earlier and letting them dry, we were just so exited with the transformation and decided to stain the tables too! The only problem- the sun was going down! We raced against daylight as we sat outside with the can of stain, cheap foam brushes and rags. We very VERY quickly slapped the stain on to the ivory bases and into the tiny crevasses with the foam brush, then took our rags and rubbed in and wiped off. As we wiped around the leg bases we looked as if we were shining shoes and left as much stain in the cracks as possible. As darkness set in, we finished the last table! The were GORGEOUS!!! they looked old and authentic, as if they had always been that color and had been handed down through generations. These 3 little thrifty tables purchased for $20, were now of so much more value to us!  The next morning mom coated them with sealant to protect the beauty we had created! (above, right side picture)

The original Goodwill table was the only table that had a drawer... on the drawer was a little wooden knob that got painted with the rest of the piece. To give the table even more character we decided to give it a new knob. We went back to Lowe's and decided on a small glass-like knob, since it fit with the Farm House look we were going for. After putting it on the table, it looked better but it just wasn't right, kind of just "blah!". So I kept my eyes open for The Knob. While browsing Hobby Lobby, not even thinking about knobs, I stumbled upon the knob section.  There is where I found that magic knob that would pull everything together! Voilà!!!!


The 3 thrifted tables lived happily ever after in the living room of a mother who loves them, with a daughter who hopes that they will be handed down to her someday! (Ahem, hint hint)
Do you have furniture that could use a change? what do you want to do to it? OR have you REVAMPed something and fallen in love with it again? 
Tell me about it below!

Until next Thursday, 
Ashley