Showing posts with label glitter. Show all posts

Monday, April 15, 2013

Turn Something Old into Something New #2

Growing up I was always under the impression that buying things at the thrift store and the Salvation Army was for poor people. Well, now that I am a poor struggling college student, I shop there too!! Lol! Just kidding. But in all seriousness, I feel like shopping at those place have a bad connotation, and I’m here to break that. Shopping at the Good Will, and similar stores not only saves you a TON of money, but it can also be like a treasure hunt. You have to sift through the bad to find that diamond in the ruff, but once you do, it makes your whole experience worth it.


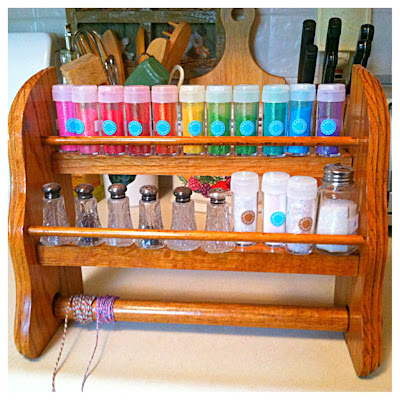
Living here in Southern California, most of the antique stores tend to be “Antique Boutiques” and can be very pricey. But places like good will, and Salvation Army are just the opposite. My latest find was this little Beauty. It’s a paper towel holder and spice rack all in one. The thing to remember when on the hunt is to keep an open mind and an open imagination. You see a crusty old spice rack with years of build up from being hung on the wall of someone’s kitchen. I see a new way to organize my glitter and twine.


I took my find up the register and purchased it for only $3.00!! That’s unheard of! Where could I find a quality piece of maple for that cheap these days? Then I took it home and put in a little elbow grease. I scrubbed the whole thing with Fantastic and a scrub brush. I got all the years of grime and build up off in very little time. Then I took some furniture polished and wiped it down until it shined just like new again. The spice shelves on it held all my bottles of glitter perfectly. It’s my dream to eventually convert all my glitter into vintage salt and pepper shakers. And I think this spice rack is the perfect way to display them.

Then I took my twine and began winding it around the paper towel dowel. Since it’s made to spin, whenever I want twine, ill just unroll the amount I need. It will NEVER tangle and always be there right when I need it. Obviously I haven’t finished winding all my twine I own, but you get the picture. Everything is where I can see it, and if I don’t say so myself, it looks pretty darn cute once it's cleaned up and displaying all my crafty treasures!


I hope you feel inspired!


Wishing all the best week ever; take good care and ill see you next Monday!

Love,

Mandy


Wednesday, March 13, 2013

DIY Glittered Sandals

About a year ago (maybe not that long...last summer, I think is a little more accurate lol)  I went over to Allison's house and when I walked in I noticed a bunch of bags full of clothes and STUFF. She said that it was stuff that she no longer wanted and that I was more than welcome to go thru it. HHHmmm she's a pretty stylish gal so I dug right in. I ended up finding these plain, worn pink sandals and for some reason thought I must have them. Now, I am not sure why she was getting rid of this particular pair, more than likely, it was because they were somewhat coming apart, but I wasn't going to question it that's for sure. I then became the proud owner of these nothing fancy kind of sandals.

I knew right away that I was going to do a DIY glitter strapped sandal and I promptly did. I was sooooo excited about how they turned out that I wore them before I finished sealing them, so slowly the glitter fell off, they are still cute, but, not nearly as fun as when they first were done.

Well that sandal weather has finally started to grace us here in Sunny Southern California so I decided that it was about time to glitter my sandals up again (and seal them too)

Here is a SUPER EASY DIY shoe makeover

This is what I started with (keep in mind that these are hand-me-downs and previously glittered)
All you will need for this project is:
Liquid glue (I used Martha Stewart Glitter Glue)
Glitter of your choice (I did a pink to match my sandal)
Clear Gloss Sealer (You can find this at any Michael's Stores)

First thing you will want to do is paint one strap with glitter
Next you will cover the glue in glitter. This is messy so make sure you are working on a surface you can pour the excess glitter back into the jar. I just used a piece of printer paper.
Once you have completed the one strap move on to the next until you have finished.
To get any excess glitter off the bottom of your sandal you can use a paintbrush and dust it off.
You will want to let them dry overnight before spraying them with a sealer and wearing. :)
Tomorrow I will be doing my finishing touches. So stay tuned because next week (Wed) I will post the big reveal of the shoes on my feet :)

Happy doing what you love day,
xoxox
Danni

Wednesday, February 27, 2013

For the Love of Color

I love rainbows. I Love colorful things. And, most importantly I Love to organize in rainbow order, you know, ROY G BIV?!?! Ya that order. It not only makes me happy to look at it also makes it super easy to find what I am looking for. So, of course it also makes sense to organize my craft supplies that way too, right? I think so!

Last week I was over at a friends house crafting it up, and needed some glitter. She told me, "oh, it's over in that drawer right there, the clear containers" and I instantly spotted them, Bright, Bold, and in color order! I was instantly in LOVE and had to find out about this neat little set up. It was so perfect in every way...Compact and completely clear AND beautiful to look at. That was when I began my mission, to go and buy those containers and make a rainbow on my shelf.

So, tonight I went to Micheal's and bought the containers, two to be exact. I thought for sure that would be enough for my glitter stash. Boy was I wrong. I don't think I even got half of it done. So, I will def. have to go back and get more. I found the containers right where my friend said they would be, in the bead/jewelry section. I think that they were $7.99 a piece.
I love how nice and snug they are in the container, no "sloshing" around.

So I had a pretty big mess and didn't really know where to start in my box. It was just all thrown in the shoebox and is such a hassell to dig thru. So I cannot wait to have these so handy.

I pretty much decided to leave Martha (Stewart) set alone and worry about that when I had more jars. It was already pretty easy to find colors to use in the set, but the rest of the box, not so much. I knew for sure I wanted to start with all the big jars. That way I could either toss them out if I ended up finishing it off or I would be able to put what was remaining in the jars away, away til I needed to refill. I also knew I wanted to empty out all the non-jar containers that I had in the box. And then pretty much I picked stuff to make a rainbow with. And, I couldn't be more happy with the end result. It is everything I was hoping for. Beautiful, Bold, and in Rainbow order. :)

 Look at all that texture. You can see everything with out digging!
 Even looking at the sides it's great!!!!!
 All around a great purchase and worth every penny!!!!! Now go get your rainbow on :)


Happy Hump Day (and a BIG Happy Birthday to my BESTest Husband EVER!!!!) See ya back next Wednesday. :)
xoxo 
Danni